Goals:
In this project, you will be setting up a Linux server to host Ansible. This server will be accessible to Windows clients via xRDP. Also, we will install a GUI on the server to allow the users to edit their ansible roles and playbooks via VScode.
Requirements:
Base OS requirements:
First follow this article: How to setup a new CentOS 7 server
Application requirements:
| Supported OS | CPU | RAM | HD Storage |
|---|---|---|---|
| CentOS 7 64-bit | 2 | 4 GB | 20 GB |
RAM:
4 GB RAM is recommended per 100 forks
Plan:
- Configure xRDP
- Configure Ansible via pip
- Configure VSCode
- Configure Inventory
Step 1: Configure xRDP
Where do you start. First
1.1: Configure Desktop
Optional: Run the following command to list down the available package groups for CentOS 7.
Input:sudoyum group listOutput:Loaded plugins: fastestmirrorLoading mirror speeds from cached hostfile* base: repos-va.psychz.net* epel: epel.mirror.constant.com* extras: repos-va.psychz.net* updates: repos-va.psychz.netInstalled Environment Groups:Cinnamon DesktopAvailable Environment Groups:Minimal InstallCompute NodeInfrastructure ServerFile and Print ServerMATE DesktopBasic Web ServerVirtualization HostServer with GUI"GNOME Desktop"KDE Plasma WorkspacesDevelopment and Creative WorkstationAvailable Groups:CinnamonCompatibility LibrariesConsole Internet Tools"Development Tools"Educational SoftwareElectronic LabFedora PackagerGeneral Purpose Desktop"Graphical Administration Tools"HaskellLegacy UNIX CompatibilityMATEMilkymistScientific SupportSecurity ToolsSmart Card SupportSystem Administration ToolsSystem ManagementTurboGears application frameworkXfceDone
Step 1: Install Gnome GUI packages using the yum
CentOS 7:
Input:sudoyum -y groupinstall \"GNOME Desktop"\"Graphical Administration Tools"\ "Development Tools"
Step 2: Enable GUI on system startup. In CentOS 7, systemd uses “targets” instead of runlevel. The /etc/inittab file is no more used to change run levels. So, issue the following command to enable the GUI on system start.
Input:sudoln-sf \/lib/systemd/system/runlevel5.target \/etc/systemd/system/default.target
Step 3: Reboot the machine to start the server in the graphical mode.
Input:sudoshutdown-r now
1.2: Configure xRDP
Step 1: Prerequisites
Install and configure EPEL repository to gain access to
Input:sudorpm -Uvh https://dl.fedoraproject.org/pub/epel/epel-release-latest-7.noarch.rpm
Install netstat which is part of the net-tools package
Input:
sudo yum install -y net-tools
Step 2: Install xrdp on CentOS 7
Install xrdp package.
*Note: There was an issue installing xrdp, correct by using –enablerepo=cr
Input:sudoyum -y installxrdp tigervnc-server --enablerepo=crOutput:Installed:xrdp.x86_64 1:0.9.11-1.el7Dependency Installed:xorgxrdp.x86_64 0:0.2.11-1.el7xrdp-selinux.x86_64 1:0.9.11-1.el7Updated:tigervnc-server.x86_64 0:1.8.0-17.el7Dependency Updated:selinux-policy.noarch 0:3.13.1-252.el7.1selinux-policy-targeted.noarch 0:3.13.1-252.el7.1xorg-x11-server-Xorg.x86_64 0:1.20.4-7.el7xorg-x11-server-common.x86_64 0:1.20.4-7.el7Complete!
Once xrdp is installed, start the xrdp service using the following command.
Input:sudosystemctl start xrdp&& \sudosystemctl start xrdp-sesman
xrdp should now be listening on 3389. You can confirm this by using netstat command.
Input:sudonetstat-antup | grepxrdpOutput:tcp 0 0 0.0.0.0:3389 0.0.0.0:* LISTEN 14518/xrdptcp 0 0 127.0.0.1:3350 0.0.0.0:* LISTEN 14516/xrdp-sesman
By default, xrdp service won’t start automatically after a system reboot. Run the following command in the terminal to enable the service at system startup.
Input:sudosystemctl enablexrdpOutput:Created symlinkfrom /etc/systemd/system/multi-user.target.wants/xrdp.service to /usr/lib/systemd/system/xrdp.service.
Step 3: Configure Firewall
Configure the firewall to allow RDP connection from external machines. The following command will add the exception for RDP port (3389).
Input:sudofirewall-cmd --permanent --add-port=3389/tcpsudofirewall-cmd --reload
Step 4: Configure SELinux
Configure xrdp file’s SELinux security context
Input:sudochcon --type=bin_t /usr/sbin/xrdp&& \sudochcon --type=bin_t /usr/sbin/xrdp-sesman
Step 5: Edit sesman.ini file
Configure sesman.ini
Input:sudosed-i.orig \-e "s|^\(AllowRootLogin=\).*|\1false|"\-e "s|^\(AlwaysGroupCheck=\).*|\1true|"\/etc/xrdp/sesman.ini
Validate changes
Input:
sudo grep \
-e AllowRootLogin \
-e AlwaysGroupCheck \
/etc/xrdp/sesman.ini

Output:
AllowRootLogin= false
AlwaysGroupCheck= true
Step 6: Add to the xrdp.ini file
Input:sudocp/etc/xrdp/xrdp.ini /etc/xrdp/xrdp.ini.origsudovim /etc/xrdp/xrdp.iniEdit File:--------------------IN FILE------------------; Session types;; Some session types such as Xorg, X11rdp and Xvnc start a display server.; Startup command-line parameters forthe display server are configured;insesman.ini.See and configure also sesman.ini.*********************Add below above section*******************************[xrdp1]name=Local User Authenticationlib=libvnc.sousername=askpassword=askip=127.0.0.1port=-1
Step 7: Add authorized users to xrdp group
create xrdp groups
Input:sudogroupadd tsuserssudogroupadd tsadmins
add user to groups
add desired users to tsusers is needed to login to the desktop via rsd.
Input:sudogpasswd -a lnxuser tsuserssudogpasswd -a lnxuser tsadmins
Add the authorized users home dir
Input:echo"exec gnome session"> /home/nsu.edu/reginaldas/.Xclientssudochmod700 /home/nsu.edu/reginaldas/.Xclients
Restart xrdp service
Input:sudosystemctl restart xrdp&&sudosystemctl enablexrdpsudosystemctl restart xrdp-sesman&&sudosystemctl enablexrdp-sesman
To automate the .Xclient file in new users
Input:sudosu-echo"exec gnome-session"> /etc/skel/.Xclientssudochmod700 /etc/skel/.Xclients
Step 8: Test xrdp Remote Connectivity
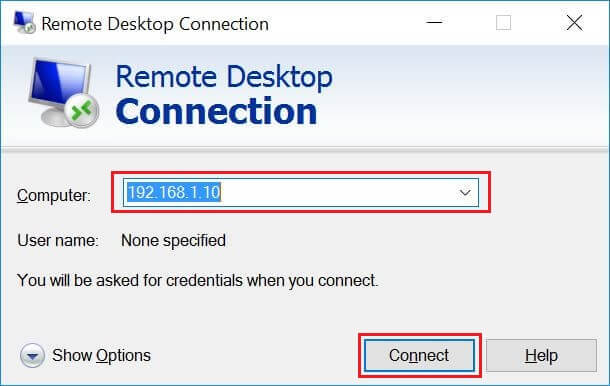
Now take RDP from any windows machine using Remote Desktop Connection. Enter the ip address of Linux server in the computer field and then click on connect.
Enter IP Address in Remote Desktop Connection Window
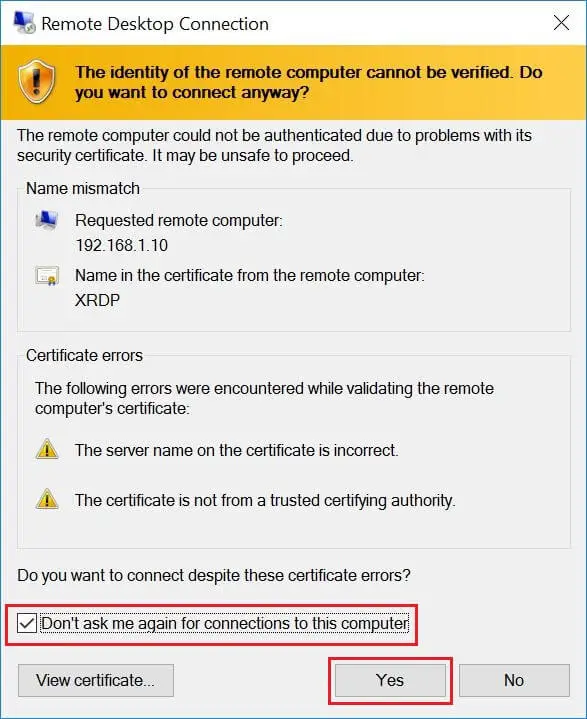
You may need to ignore the warning of RDP certificate name mismatch.
Accept the Certificate
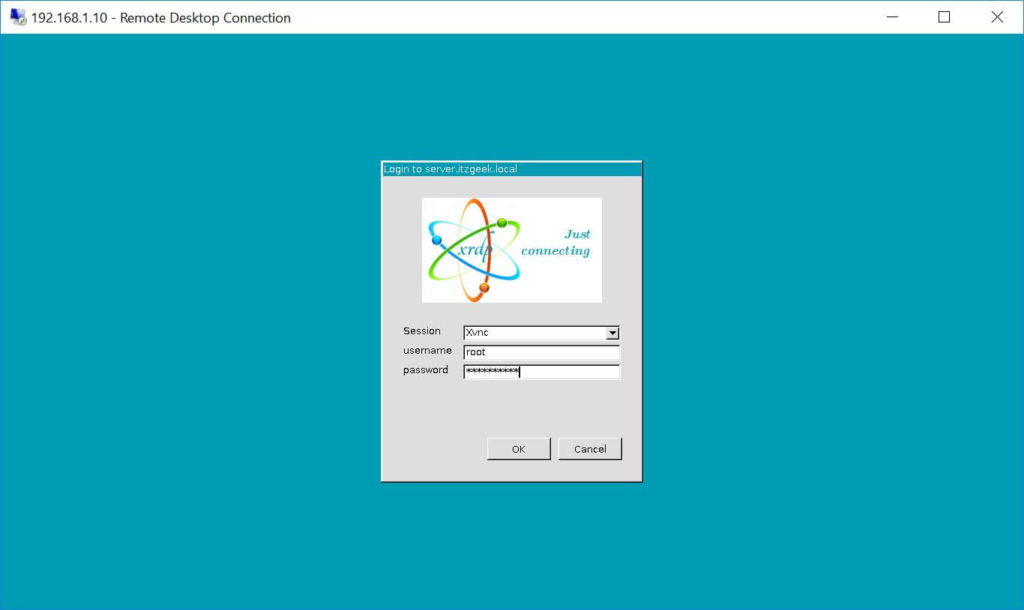
You would be asked to enter the username and password. You can either use root or any user that you have it on the system. Make sure you use module “Xvnc“.
xRDP Login Page
If you click ok, you will see the processing. In less than a half minute, you will get a desktop.
xRDP CentOS Desktop
That’s All. You have successfully configured xRDP on CentOS 7.
Step 2: Configure Ansible via pip
Step 1: Install Python on CentOS 7
1: Install and Set your default Python on CentOS 7 using the guide below.
Python 3.6 can be installed on CentOS 7 by running the command below on your terminal.
# Input:sudoyum -y installpython36# Output:Installed:python36.x86_64 0:3.6.8-1.el7Dependency Installed:python36-libs.x86_64 0:3.6.8-1.el7 Complete!
The same applies to all other Python 3 Libraries.
To use Python 3, just type
python3
1.1: Install Python 2.7 on CentOS 7
For some guys with existing software not ready to run on Python 3, CentOS 7 got you covered. It contains the Python 2 stack.
Install Python 2.7 on CentOS 7 in parallel with Python 3 using the command:
Input:sudoyum -y installpython2
Confirm:
Input:$ whichpython2/usr/bin/python2
To use Python 2.7, type the command:
Input:
python2
2: Set Default Python Version
You should have noted that to use Python 3, the command is python3andpython2 for Python 2. What if your applications are configured to refer to python which is not available system-wide.
$ python
bash: python: command not found...
2.1: You can use the alternatives mechanism to enable the unversioned python command system-wide, and set it to a specific version:
Set Python 3 as default:
sudo alternatives --set python /usr/bin/python3 |
Set Python 2 as default:
$ sudo alternatives --set python /usr/bin/python2$ which python/usr/bin/python |
2.2: Running python -V should show default Python version configured
$ python -VPython 2.7.15 |
Use Python 2 via python:
$ pythonPython 2.7.15 (default, Oct 16 2018, 15:28:01)[GCC 8.2.1 20180905 (Red Hat 8.2.1-3)] on linux2Type "help", "copyright", "credits" or "license" for more information.>>> |
To reset this configuration and remove the unversioned python command, run:
$ sudo alternatives --auto python |
Enjoy using Python for your Development Projects in CentOS 7.
3: Once it has been installed, proceed to install Pip which is a Python package manager used to install Ansible.
If you’re using Python3, install python3-pip package.
# Input: sudo yum -y install python36-pip sudo pip3 install --upgrade pip # Output: Collecting pipDownloading https://files.pythonhosted.org/packages/30/db/9e38760b32e3e7f40cce46dd5fb107b8c73840df38f0046d8e6514e675a1/pip-19.2.3-py2.py3-none-any.whl (1.4MB)100% |████████████████████████████████| 1.4MB 711kB/sInstalling collected packages: pipFound existing installation: pip 8.1.2Uninstalling pip-8.1.2:Successfully uninstalled pip-8.1.2Successfully installed pip |
For Python2 users you have to install python2-pip
sudo yum -y install python2-pipsudo pip2 install --upgrade pip |
Step 2: Install Ansible on CentOS 7
# Input: sudo yum -y install ansible # Output: Installed:ansible.noarch 0:2.8.4-1.el7 Dependency Installed:python-babel.noarch 0:0.9.6-8.el7 python-httplib2.noarch 0:0.9.2-1.el7 python-jinja2.noarch 0:2.7.2-3.el7_6 python-markupsafe.x86_64 0:0.11-10.el7python-paramiko.noarch 0:2.1.1-9.el7 python2-jmespath.noarch 0:0.9.0-3.el7 sshpass.x86_64 0:1.06-2.el7 Complete! |
1: Once you have Pip installed, use it to get Ansible installed in your CentOS 7 machine.
# Input: $ pip3 install ansible --user # Output: Collecting ansibleDownloading https://files.pythonhosted.org/packages/04/25/48fee5f8048360d9375e01846fcf395dda58242ed1f25a2106b6794452eb/ansible-2.8.5.tar.gz (14.4MB)|████████████████████████████████| 14.4MB 2.1MB/sCollecting jinja2 (from ansible)Downloading https://files.pythonhosted.org/packages/1d/e7/fd8b501e7a6dfe492a433deb7b9d833d39ca74916fa8bc63dd1a4947a671/Jinja2-2.10.1-py2.py3-none-any.whl (124kB)|████████████████████████████████| 133kB 29.4MB/sCollecting PyYAML (from ansible)Downloading https://files.pythonhosted.org/packages/e3/e8/b3212641ee2718d556df0f23f78de8303f068fe29cdaa7a91018849582fe/PyYAML-5.1.2.tar.gz (265kB)|████████████████████████████████| 266kB 38.7MB/sCollecting cryptography (from ansible)Downloading https://files.pythonhosted.org/packages/97/18/c6557f63a6abde34707196fb2cad1c6dc0dbff25a200d5044922496668a4/cryptography-2.7-cp34-abi3-manylinux1_x86_64.whl (2.3MB)|████████████████████████████████| 2.3MB 28.5MB/sCollecting MarkupSafe>=0.23 (from jinja2->ansible)Downloading https://files.pythonhosted.org/packages/b2/5f/23e0023be6bb885d00ffbefad2942bc51a620328ee910f64abe5a8d18dd1/MarkupSafe-1.1.1-cp36-cp36m-manylinux1_x86_64.whlCollecting cffi!=1.11.3,>=1.8 (from cryptography->ansible)Downloading https://files.pythonhosted.org/packages/5f/bf/6aa1925384c23ffeb579e97a5569eb9abce41b6310b329352b8252cee1c3/cffi-1.12.3-cp36-cp36m-manylinux1_x86_64.whl (430kB)|████████████████████████████████| 440kB 21.9MB/sCollecting six>=1.4.1 (from cryptography->ansible)Downloading https://files.pythonhosted.org/packages/73/fb/00a976f728d0d1fecfe898238ce23f502a721c0ac0ecfedb80e0d88c64e9/six-1.12.0-py2.py3-none-any.whlCollecting asn1crypto>=0.21.0 (from cryptography->ansible)Downloading https://files.pythonhosted.org/packages/ea/cd/35485615f45f30a510576f1a56d1e0a7ad7bd8ab5ed7cdc600ef7cd06222/asn1crypto-0.24.0-py2.py3-none-any.whl (101kB)|████████████████████████████████| 102kB 25.1MB/sCollecting pycparser (from cffi!=1.11.3,>=1.8->cryptography->ansible)Downloading https://files.pythonhosted.org/packages/68/9e/49196946aee219aead1290e00d1e7fdeab8567783e83e1b9ab5585e6206a/pycparser-2.19.tar.gz (158kB)|████████████████████████████████| 163kB 39.1MB/sInstalling collected packages: MarkupSafe, jinja2, PyYAML, pycparser, cffi, six, asn1crypto, cryptography, ansibleRunning setup.py install for PyYAML ... doneRunning setup.py install for pycparser ... doneRunning setup.py install for ansible ... doneSuccessfully installed MarkupSafe-1.1.1 PyYAML-5.1.2 ansible-2.8.5 asn1crypto-0.24.0 cffi-1.12.3 cryptography-2.7 jinja2-2.10.1 pycparser-2.19 six-1.12.0 |
For Python2 pip, use:
$ pip2 install ansible --user |
2: You can see Ansible installed using the following command:
# Input: $ ansible --version # Output: ansible 2.8.5config file = Noneconfigured module search path = ['/home/nsu.edu/reginaldas/.ansible/plugins/modules', '/usr/share/ansible/plugins/modules']ansible python module location = /home/nsu.edu/reginaldas/.local/lib/python3.6/site-packages/ansibleexecutable location = /home/nsu.edu/reginaldas/.local/bin/ansiblepython version = 3.6.8 (default, Apr 25 2019, 21:02:35) [GCC 4.8.5 20150623 (Red Hat 4.8.5-36)] |
Step 3: Testing Ansible on CentOS 7
1: To test Ansible, you should have OpenSSH service running on the remote server.
$ sudo systemctl status sshd● sshd.service - OpenSSH server daemonLoaded: loaded (/usr/lib/systemd/system/sshd.service; enabled; vendor preset: enabled)Active: active (running) since Sat 2018-12-29 20:17:11 EAT; 39min agoDocs: man:sshd(8)man:sshd_config(5)Main PID: 820 (sshd)Tasks: 1 (limit: 11510)Memory: 4.6MCGroup: /system.slice/sshd.service└─820 /usr/sbin/sshd -D -oCiphers=aes256-gcm@openssh.com,chacha20-poly1305@openssh.com,aes256-ctr,aes256-cbc,aes128-gcm@openssh.com,aes128->Dec 29 20:17:11 rhel8.local systemd[1]: Starting OpenSSH server daemon...Dec 29 20:17:11 rhel8.local sshd[820]: Server listening on 0.0.0.0 port 22.Dec 29 20:17:11 rhel8.local sshd[820]: Server listening on :: port 22.Dec 29 20:17:11 rhel8.local systemd[1]: Started OpenSSH server daemon.Dec 29 20:19:03 rhel8.local sshd[1499]: Accepted publickey for jmutai from 192.168.122.1 port 35902 ssh2: RSA SHA256:b/8AoYgbThoBYPcFh7CetJuGY/Tl7s4fi>Dec 29 20:19:03 rhel8.local sshd[1499]: pam_unix(sshd:session): session opened for user jmutai by (uid=0) |
2: Create Ansible inventory file, default is /etc/ansible/hosts
$ vim hosts |
2.1: Copy the IP address of your remote server(s) to manage and add to Ansible inventory file.
$ echo "192.168.122.197" > hosts |
2.2: You can also create a group of hosts like below:
[web]192.168.122.197 [db]192.168.122.198 [staging]192.168.122.199192.168.122.200192.168.122.201 |
3: Generate SSH key and copy it to remote servers.
$ ssh-keygen$ ssh-copy-id jmutai@192.168.122.197 |
3.1: Use ping module to test ansible:
$ ansible -i hosts 192.168.122.197 -m ping 192.168.122.197 | SUCCESS => {"changed": false,"ping": "pong"} |
3.2: The -i option is used to provide path to inventory file. You should get the same output for hosts group name.
Input:$ ansible -i hosts web -m ping192.168.122.197 | SUCCESS => {"changed": false,"ping": "pong"}
3.3: For commands that need sudo, pass the option --ask-become-pass. This will ask for privilege escalation password. This may require installation of the sshpass program.
Input:$ ansible -i hosts web -m command-a "sudo yum install vim"--ask-become-pass....192.168.122.197 | CHANGED | rc=0Output:>>Updating Subscription Management repositories.Updating Subscription Management repositories.Last metadata expiration check: 0:52:23 ago on Sat 29 Dec 2018 08:28:46 PM EAT.Package vim-enhanced-2:8.0.1763-7.el8.x86_64 is already installed.Dependencies resolved.Nothing to do.Complete!